
In the Appalachian Highlands, “putting up” or canning isn’t just a chore or a challenge; it is the boundary between the abundance of summer and the lean gray of winter. For many generations, the sound of a pressure canner rocking on a stove and the “ping” of a sealing lid have been heard in homes throughout the Highlands in August and September.
While today we might can for flavor or nostalgia, for our ancestors, it was a matter of survival. But how did we get from salt barrels and fermentation crocks to the precise science of the Mason jar? The story of canning is one of chemistry, war, and the tireless human urge to cheat time.

Part I: Canning: From Napoleon to the Mason Jar
The preservation of food remained largely unchanged for millennia—drying, smoking, and salting were the only reliable methods. Next arrived the French Revolution. In 1795, hoping to feed his sprawling armies, Napoleon Bonaparte offered a 12,000-franc prize to anyone who could invent a new method for preserving food.
After 15 years, the French confectioner, Nicholas Appert, claimed the prize in 1809. Appert discovered that if he placed food in glass bottles, tightly corked them, and boiled them for hours, the food didn’t spoil. He didn’t know why it worked (Louis Pasteur wouldn’t demonstrate the role of microbes for another 50 years), but he knew it worked.

However, the method didn’t truly reach the Appalachian frontier until the invention of the jar. In 1858, a tinsmith named John Landis Mason invented a square-shouldered glass jar with a threaded neck and a zinc screw cap. The “Mason Jar” was born.

In the mountains, this technology slowly replaced the older methods of “pickling” in open crocks. Where families once relied on salt fermentation (sauerkraut, pickled beans) to preserve vegetables, they could now use heat and vinegar to create shelf-stable goods that lasted for years.
Part II: The Science (Battling the Invisible)

Canning is essentially a war against two enemies: Enzymes and Microorganisms.
- Enzymes: Naturally present in food, they cause ripening and eventually rotting. Heat (blanching or processing) permanently deactivates them.
- Microorganisms: Yeasts, molds, and bacteria are the real threat. While molds are visible, the deadliest enemy is invisible: Clostridium botulinum.
The Botulism Barrier (The pH Rule)
The science of safe canning revolves around one number: 4.6 on the pH scale.
- High-Acid Foods (pH 4.6 or lower): Fruits, tomatoes (usually), and pickles. The natural acid in these foods prevents C. botulinum spores from germinating. These foods only need to be heated to 212°F (100°C) to kill yeasts and molds. This can be done in a Water Bath Canner.
- Low-Acid Foods (pH higher than 4.6): Vegetables (green beans, corn, carrots), meats, and poultry. These foods lack the acid to stop the bacteria. C. botulinum spores can survive boiling water. To kill them, you must reach 240°F (116°C). The only way to reach this temperature is under pressure. These foods MUST be processed in a Pressure Canner.
The Vacuum Seal
The final piece of the science puzzle is the vacuum. When the jar is heated, the contents expand, pushing air out of the jar. As the jar cools, the contents contract, pulling the lid down tight against the rim. This hermetic seal blocks new bacteria from entering. If the seal fails, the food is compromised.
Part III: Methods & Best Practices

1. Water Bath Canning
- Best for: Jams, jellies, pickles, relishes (like Chow Chow), and most fruits.
- The Method: Jars are submerged in boiling water (at least 1-2 inches over the tops) for a specific time.
- Critical Tip: Don’t guess the time. Use a modern, tested recipe (such as those from the USDA or the Ball Blue Book). Old “open kettle” methods (just pouring hot food into jars and flipping them upside down) are no longer considered safe.

2. Pressure Canning
- Best for: Green beans, corn, soups, meats, and stews.
- The Method: Jars are placed in 2-3 inches of water in a pressure canner. The lid is locked, and steam builds pressure (usually 10 or 11 lbs., depending on altitude).
- Critical Tip: You must adjust for altitude. In the Appalachian Highlands (often above 1,000 or 2,000 ft), you likely need to process at higher pressure than the standard “sea level” instructions.
Part IV: The Gear
To start “putting up” safely, you need the right tools:


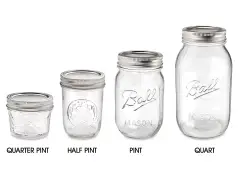

- Jars: Mason jars specifically designed for canning (check rims for chips). Do not reuse mayonnaise or pasta sauce jars; the glass is often too thin to survive the thermal shock.
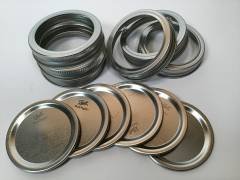
- Lids & Bands: You can reuse the screw bands (rings), but never reuse the flat metal lids. The sealing compound is good for one use only.
- Jar Lifter: A specialized tong with rubber grips to safely lift hot jars out of boiling water.
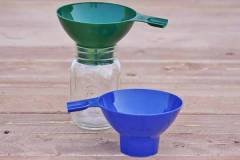
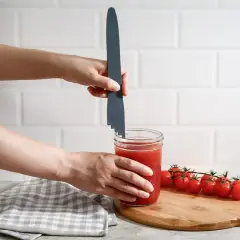
- Canning Funnel: Wide-mouthed to keep rims clean. A dirty rim equals a failed seal.
- Bubble Remover: A plastic wand (or chopstick) to release trapped air pockets before sealing.

Part V: The Appalachian Icon — Chow Chow
If there is one jar that represents the spirit of Appalachian preservation, it is Chow Chow.
Historically, Chow Chow was an “end-of-garden” relish. It was born from frugality—a way to use the stunted green tomatoes, the last cabbage, the straggling peppers, and the onions before the first killing frost hit the hollows. Every family has a slightly different recipe, often passed down orally, varying in heat (peppers) and sweetness (sugar).
It is traditionally served as a condiment to cut the richness of Pinto beans and cornbread, or as a topping for hot dogs or hamburgers.

Recipe: High Country Chow Chow
This recipe relies on vinegar (acid) to make it safe for Water Bath Canning.
Ingredients:
- 4 cups green tomatoes, chopped
- 4 cups cabbage, chopped
- 2 cups green bell peppers, chopped
- 1 cup sweet red peppers, chopped
- 2 cups onions, chopped
- Hot peppers (jalapeño or cayenne) to taste
- 1/3 cup canning salt
- The Brine:
- 4 cups apple cider vinegar (5% acidity)
- 2 tbsp mustard seed
- 1 tbsp celery seed
- 3 cups sugar (brown or white)
- 1 tsp turmeric (for the traditional yellow color)
- 1 tsp ground ginger
Instructions:
- The Purge: Combine all chopped vegetables in a large non-reactive bowl (glass or stainless steel). Sprinkle with the canning salt and toss to coat. Let stand for 4 hours or overnight in a cool place. This draws out excess water, keeping your relish crisp rather than mushy.
- Rinse: Drain the liquid and rinse the vegetables thoroughly to remove the salt. Drain again, pressing out extra moisture.
- The Simmer: In a large stainless-steel pot, combine the vinegar, sugar, and spices. Bring to a boil. Add the drained vegetable mix. Simmer for 10 minutes.
- The Pack: Ladle hot relish into hot, sterile pint jars, leaving ½ inch of headspace. Remove air bubbles. Wipe rims clean. Center the lid and screw the band on until “fingertip tight.”
- The Process: Process jars in a boiling water bath for 10 minutes (adjust for altitude: add 5 minutes if above 1,000 ft).
- The Cool Down: Remove jars and let them sit undisturbed on a towel for 24 hours. Check seals.

A Final Note
When you open a jar of Chow Chow in January, you aren’t just eating relish. You are tasting the labor of the summer, preserved through the science of the past, connecting you to every Appalachian cook who ever stood over a hot stove to ensure their family was fed.


Leave a Reply